Once again google has screwed my hyperlinks here are the update links to the RV gear mod and Aircraft build photos
Miss October
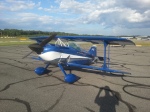
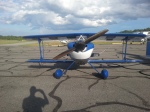
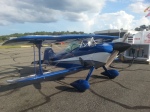
October 4, 2015While on my Oshkosh 2015 adventure I was asked if I wanted to do a in-flight photo shoot the answer is Yes of course. Well there is supposed to be an article to go with all these photos they took but I was suprised to find out that one of the photos was EAA October 2015 computer desktop calendar!! Its a really great photo too!

 Leave a Comment » |
  Uncategorized |
  Permalink
 Posted by acropilotbret
Across the Country Cross Country
October 4, 2015The prep
I was lucky in that I recently made the trek to Oshkosh which in magnitude is shorter but the complexity and prep was similar. Since I made it there and back I figured I could make it to California. I was close on oil change time so I did that early. This gave me the ability to look over the FWF really well. I went out and bought a new seat cushion from bed bath and beyond as I my butt was hurting a bit from the Oshkosh trip (I love this seat cushion by the way). I did a prep pack to make sure all the stuff I wanted to bring would A) Fit and B) make weight. I wanted the C.G. back to increase the cruise true airspeed a bit so I loaded the baggage compartment such that I was near the aft line on the plot. I took plenty of tools since I was going to be out of my tools for the better part of 30-45 days once I got there till the house closed and the movers could deliver my stuff (included tools). I planned out my flight using Foreflight and 1:20 – 1:40 min legs (~160-195 nm at my cruise speed of 155 MPH). The 1:40 min legs typically left me with 6.5 to 7 gallons of gas on landing during my trip to Oshkosh. I really wanted out of the plane to stretch anyway. I did the great circle route from 2W6 to KDWA and using the ruler tool I started picking airports along the route. I really didn’t try to find cheap fuel as it really only complicated efforts and didn’t save much money for the effort. I planned on going the northern route following I-80 once I got to Nebraska. I watched the weather patterns like a hawk the week prior and also looked at the freezing levels (I have no heat) as I was thinking I would need to go to at least 11,000 ft to get over the continental divide. This all worked out to be about 13 airports and about 17.5 hours of actual flight time (not to include taxi just flight time FAR 1.1 for those inquisitive minds). So to add to all the fun I didn’t exactly have all the time in the world. I needed to be back to meet the movers by Wednesday midday ( I was leaving on a Saturday) So I had time but not oodles of it.
Day 1 2W6 – KLWB – KIOB
I woke up day 1 which is Sep 19th to Low IFR all over DELMARVA area. It was forecasted to lift by about 1100. So already I was going to behind my time line. Also there was a cold front heading across the Midwest that had influences all the way down to Texas so no going around it. There were some areas that looked like I could thread the needle down by Louisville so I adjusted my route some to try and get around it. I left by 1230 and my first stop of Lewisberg, West Virgina. The flight out was uneventful but long 1.5 hour in flight 13.8 gallons. I landed in Lewisberg and the nice FBO line guy came over and asked me what he could do for me. I told him just need some fuel and I’ll be on my way. He looked at me and said we don’t have any 100LL. With a dumbfounded look I said “well you got to be ****ting me?” he said his fuel supplier dropped the ball and they were on low reserves for the next few days. They said they were low on the truck but had some and I said I would take what I could get. I only needed 14 gal so he had to have enough. I got my gas and went on my way.
Next stop was KIOB Mt Sterling, Kentucky. Nice airport and FBO. The cold front was moving faster than I had hoped and it was 1530 by the time I got there. They said they had a hangar and courtesy car so I opted to for the known versus the unknown and called it quits for the day as the forecast looked really good for the next few days.
Total for the day was 2.9 hour and 26.2 gallons
Day 2 KIOB – KRSV – KUIN – KEVU – KEAR – KSNY
I woke up in my Days Inn room to a bright orange cloudless sky. I got to the airport about 0800 as I was told that no one would be there until then. On my way to the airport I got a sandwich so I wouldn’t have to go out in town somewhere to find food (gas stops take long enough) I got my plane out and on my way. I made 5 stops totaling 6.6 hours of flight time and 60.6 gallons of fuel. Each stop was good and my final stop KSNY (Sidney, NE) was home of Cabelas. The super nice guy George owner operator of the FBO hooked me up with a really nice hangar a ride to the Hampton Inn as his courtesy car was down. He even picked me up in the morning. I highly recommend stopping there if your in the area nice small town and super friendly airport.
Day 3 KSNY – KLAR – KRKS – KOGD – KEKO – KRTS
Another absolutely wonderful flying day super huge high pressure in the area and the winds weren’t terrible. This day is when I needed to climb high to get over the continental divide. My first stop was Larmie, WY up at 7,284 ft. My plane would pretty much not idle here as it was set at sea level. I even lean aggressively but not enough air here. I believe this is the highest airport I have ever landed at to date. Out of Larmie I climbed up to 11,500 ft to keep a decent distance from the terra firma. I decided early on in the planning that I would try to stay below 12,000 ft and would follow I-80 fairly closely from this point on. Rocksprings was next and it was absolutely calm and a 10,000 ft long runway up at 6,200 ft. Ogden, UT was next this is where I deviated from the I-80 to avoid the Class A. I got to do this really cool canyon run that popped out right at the Class D for Ogden. I then went on to Elko Nevada. My next stop was Reno Stead my home town and all of my family still live there. This was the longest flight at 200 nm and 1.6 hours. I landed there about 1800 sunset was 1900. The Reno Air Races had just finished the day before and there was still stuff everywhere. My cousin met me out there to let me put my plane in his hangar for the evening. I stayed with my sister that night and my Aunt took me to the airport the next morning (see my whole family lives there)
Total flight time was 6.7 hours 57.5 gallons of fuel.
Day 4 KRTS – KDWA.
Final day. I had my wife book me a cheap flight out of Sacramento at 1400 so as long as I made it down there to make my flight I was good. Easy flight over the Sierra’s at 10,500 about 55 min enroute. I landed at Yolo County Airport put my plane in it’s new temp hangar and my real estate agent came and picked me up to take me by the house we are buying. Then she took me to the airport (really great Lady BTW). I made my flight and was back in Maryland by 2345 that evening. Sheesh.
Total flight time this day was 1.0 hours 8.9 gallons of fuel.
Grand Total was 17.2 hours of actual flight time 19.4 logged (FAR 1.1 flight time move under own power for flight…) 153.2 gallons of fuel. 2,165 nm, 12 states, 13 airports (14 if you count my starting airport).
Leave a Comment » | Uncategorized | Permalink
Posted by acropilotbret
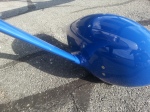
Wheel Pants and integrated intersection fairing complete
October 4, 2014Just want to post a few photos of the painted wheel pants modified with a integrated intersection fairing. Yeah I know almost 2 years later!
Leave a Comment » | Uncategorized | Permalink
Posted by acropilotbret
Broken Picasa Links
November 13, 2013I have now just realized that all my photos that show up in my blog are now broken. Thanks to google changing my links they are nearly all broken. I have fixed a few but most are dead. I repaired the links to my Picasa albums so if you need a reference please go there for now. If you need help contact me. Until I fix the 1000+ links you have to deal with sorry!
Leave a Comment » | Uncategorized | Permalink
Posted by acropilotbret
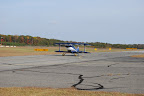
Climb out
July 23, 2013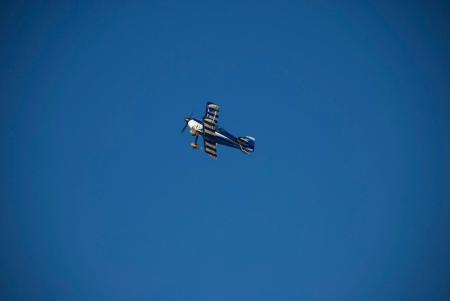
Sorry I haven’t posted in a good long time not much to talk about been doing a little flying still working through the fly off hours. I haven’t done much to the plane other than gas and very little oil. A good friend of mine snapped this photo of my climb out and i though it was cool. Anyway Enjoy.
Leave a Comment » | Uncategorized | Permalink
Posted by acropilotbret
2012 in review
December 30, 2012The WordPress.com stats helper monkeys prepared a 2012 annual report for this blog.

Here’s an excerpt:
4,329 films were submitted to the 2012 Cannes Film Festival. This blog had 26,000 views in 2012. If each view were a film, this blog would power 6 Film Festivals
Leave a Comment » | Uncategorized | Permalink
Posted by acropilotbret
The first 8 hours, Climb Performance, Level Flight Performance, Roll Performance and Aerobatics
November 25, 2012I have been flying quite a lot (for me at least) We have had great weather on the weekends and I have been taking advantage of all of them. I have now logged 8.1 hours of flight time and everything is going well. I have completed climb performance, descent performance at 2,000 Ft Hp, I have also completed Level Flight Performance at 2 and 4,000 ft Hp. As for aerobatics I have completed roll performance and quite a lot of maneuvers; Loop, rolls, Half, full and reverse have cuban eights, Hammer heads, 2/4, 3/4 and full vertical up and down rolls, and Stalls. The following are my results so far:
Stall Speed: 63 Mph (The stall is completely straight with no roll off)
Vy @ 2,000 ft Hp: 2,812 ft/min at 114 mph
Vx @ 2,000 ft Hp: 84 mph at 20 deg flight path angle
Best Glide @ 2,000 ft Hp: 96 mph with 7.7:1 glide ratio
Vmin Rate of Descent at 2,000 ft Hp: 90 mph at 1,050 ft/min
Max Endurance at 2,000 ft : 5.4 hours at 85 mph
Max Endurance at 4,000 ft Hp: 5.6 hours at 90 mph
Max Range No reserve @ 2,000 ft Hp: 450 Miles at 92 mph
Max Range No reserve @ 4,000 ft Hp: 530 Miles at 103 mph
Here are the results for the aerobatics in this video, although it is sloppy aerobatics it was nice to flop the plane around for the first time.
2 Comments | Flying | Permalink
Posted by acropilotbret
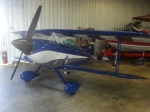
Airworthiness Inspection and First Flight!
October 28, 2012So after a overseas 2 week vacation I finally got the FSDO to come down and inspect my plane. Wednesday the inspector showed up took a look at the vitals and said, “well this will be the easiest one I’ve ever done, you did a really nice job” That made me feel really good and 40 minutes later I had a set of operating limitations, flight test area map, an airworthiness certificate, and smile.
Wednesday and Thursday night I spent the evening putting the plane back together, I installed all the panels and fairings.
I installed the wheel fairings Friday morning and when the weather cleared I started the plane up and taxied out to the runway made double sure that everything was running great and poured on the throttle. She got airborne rather quickly and climbed like a homesick angel. It was a short flight but I look forward to more successful flights. The hurricane was baring down on us so I put her away for the weekend and I will do some more flying when the weather gets better. Here are some photos.
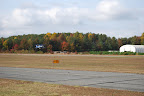


1 Comment | Uncategorized | Permalink
Posted by acropilotbret
Continued the final inspection and high power engine run
September 16, 2012So today I finished the final inspection. After words I did some more taxi tests to make sure everything was rigged right and the tail wheel responds the way I wanted it to do. This was also to double check the brakes were working well. I decided I wanted to make sure the engine ran well even up in the higher RPM area but the brakes barely hold the plane at 1800 RPM so I decided to tie the tail spring to a tie down ring and do a high power run up. After the engine had time to warm up about 10 min I did some leaning and mag checks (50 RPM mag drops!) I ran the engine at full power for about 5 min straight. At full throttle I was able to get 2450 RPM steady. So she has a lot of pull. I also checked to make sure the fuel valve, if turned off during the run, adaquately killed the engine, the answer is yes it does. I also did some acceleration testing on the engine to make sure if I poured on the throttle it would respond quickly with out any hessitation and it does this well too.
Time spent today 5 hours
Total Time spent 1635 hours.
Leave a Comment » | Fuselage, Wings | Permalink
Posted by acropilotbret

You must be logged in to post a comment.