Priming the Turtle deck (2nd coat) and fuel tank straps and continued work on the exhaust channel

July 3, 2012

Today re-shot primer on the turtle deck and also shot primer on the fuel tank straps. While that was drying worked on the exhaust channel. I fabricated some angles and drilled the rivet holes and clecoed them in place. I also drilled the cleco holes to hold the the three pieces together. I think I will shoot 1/8 button head rivets into those rather than screws. I got some marks on the firewall sheet that I will drill through and attache the front side of the exhaust channel to tie everything together that I need to fold using the brake at the airport.

After that I worked on the rear baffles on the engine. I bought the three pieces of the rear baffle from Vans since they take too much brain power and way to much work to make and for $61 I think it was worth my time and money. As it turns out they fit great and all I need to do in fabricate the #3 and #4 cylinder baffles. I quickly traced out the cylindar shape and then cut that out of 0.032 sheet I had left over. I then needed to do some folding in the brake so I took the firewall and the cylinder baffles to the airport to put a couple of bends in them.

After all that I sanded the turtle deck fuel tank straps smooth and then shot the blue on the turtle deck and straps.

Time spent today 8 hours
Total time spent 1440 hours


New exhaust channel, filling sanding and priming the turtle deck

July 2, 2012

Today we after boating I folded the new exhaust channel and brought it hope to find that it fits really well. After that I started working on lower firewall angles so that belly pan and exhaust channel after something to attach to I still need to cut up some angles to attach to the fire wall but it is trimmed to fit correctly now. After that I worked on the turtle deck by filling and sanding the rivets that I installed to help mechanically back up the 2216 adhesive that I glued the turtle deck floor to the side of the turtle deck. After I was satisfied I masked up the area that I didn’t want primer on and then shot the white primer on to the surface and let that dry. I will get some photos of the belly pan and firewall interface tomorrow, sorry for the wait.

Time spent today 3 hours
Total time spent 1432 hours


Fit checking the left stab and elevator, fitting and installing the turtle deck floor and removable bulkhead

June 26, 2012

Tonight I started off by fit checking the left stab and elevator. After I got them into to position I hooked up the elevator push/pull tubes to see how everything felt, which was very smooth. After that I got the bug to finally finish off the turtle deck. I started by masking off the carbon I was going to keep “raw” (I have plans to clear coat that area which is in the cockpit only door and cockpit bulk head) and I was going to prime it to see where I was with my pin hole filling, but I stopped and decided that the floor and removable Lexan Bulk head had to be installed first. I had already drilled an fit the Lexan bulk head so all I had to do was installed the 1/4 turn camlocs. I drilled the lexan and bulk head out to 1/4″ for the camlocs and installed the camloc backing into the bulk head and back drilled the holes (makes for a quick drilling guide. I then counter sunk the rivet holes in the carbon and drilled out the carbon camloc main hole out to 3/8″. I installed the camloc backs and viola everying fits right and easy. After that I moved on to turtle deck and floor. I measured for the rivets to attach the floor the turtle deck and I drilled out the 3/32″ holes. I initially wasn’t going to install rivets as I was going to glue the turtle deck to the floor but I decided I needed some kind of mechanical back up. So anyway I scuffed the floor intersection with 100 grit sand paper to give it some “grit”. I then mixed up the left over 2216 B/A Scotch-weld glue I had left over from the ailerons applied it the the floor turtle deck/floor intersection then installed all the rivets to keep everything inplace. Turned out pretty good. Now that that is complete I can fill the rivet holes with filler and sand them flush prime and paint this sucker. Will be nice to have it painted.

Time spent tonight 6 hours
Total time spent 1423 hours


Top Coat on the engine cowling

April 27, 2012

Today I decided it was time for the engine cowling to go blue.  I finished up the final sanding on the cowling to 320 grit.  The cowling didn’t need primer any where except for where I expanded the left cowling out to fit the engine.  I have been filling and sand for several weeks now on and off.   So I shot a final primer coat on to those parts and then let them dry.  While those parts were drying I shot a first coat of eko-fill on the gear leg fairings.  This really highlighted the pin holes in the leg.  I nearly had to sand most of it off and I will need to re-shoot them.  On Thursday I worked on the turtle deck by sanding the latest batch of clear coat in hopes of filling in some of pin holes.  It sort of works but its a real PITA.  I think I got it good enough and will use primer from here on out.    Anyway back to the cowling.  Once the primer was dry I sanded it down with 320 and then wiped everything real good with 91% alcohol loaded them in to the booth mixed paint and started shooting.  41 min later they looked like this:

The next day I took them out for a photo shoot:

And for all you video folks:

Time spent today 8 hours

Total Time spent 1268 hours


Canopy panel, cockpit inst panel, turtle deck, and painting the rudder

April 8, 2012

Today was a busy day I got all sorts of work done on the canopy panel. First thing first. I measured marked and trimmed the canopy panels ends to meet up with the turtle deck. I then marked and cut the inside coping tube (4130) then I welded an extension tube on to it to lengthen to the end of the new canopy panel. After that I marked and drilled new holes for the rivets on the extension. I sanded the tubing down in prep for priming. I figured the tubing would start to corrode if it was primed after being attached to the panel so decided to prime it, then attach it. So after I was happy with everything I made sure the turtle deck was in place and and I drilled the holes and installed the nut plates that hold the top of the panel to the turtle deck. After all that was done I removed both panels and the windscreen skirt and etched and rinsed them allowing them to dry for several hours. I cleaned them all off with alcohol and primed them. While they dried I pulled the instruments out of the instrument panel and started to sand it down in prep for some primer. I didn’t strip this one as I though I could salvage the primer that I used a few years ago. In hindsight I will likely strip it and re-etch and prime. A hour or so after I primed canopy panels, coping and windscreen skirt I pulled them out of the booth so that I could top coat the rudder.

Now with the top coat on the rudder I decided since I was having some orange peel issues that I would thin the mix a little more using 2.85 instead of the 3.0 on the can. It worked a little better but I still think it needs more so next time I will use 2.75 and see how that does.

Time spent 8 hours
Total time spent 1254 hours


Turtle Deck Hartwell Latch, Rudder Covering, lower right wing inspection rings

January 31, 2012

This week I received the hartwell latch from Wicks aircraft since the latch from Aircraft spruce was $148 and the latch from wicks was $13.20! I got right to work measuring and when i got it right where I wanted it I started removing some of the balsa wood so it would fit properly. I then used my dremel tool to cut out the shape of the latch.

After that I decided to start covering the rudder with left over fabric from the lower right wing. Kinda a rinse and repeat of the elevators and stabs so I won’t go into detail. The only challenge was cleanly getting around the rudder control horn and hinge combo. But other than that mostly routine.

After that I decided to glue on the lower right wing inspection rings. Once they were glued down I added a wet layer of glue over the top to dry for the doilies. After the glue dried I ironed on the doilies. (no pictures sorry)

Time spent 8 hours
Total time spent 1078 hours


Aft turtle deck bulk head, and turtle deck door.

January 22, 2012

This past weekend I worked on the aft turtle deck bulk head so I had a chance to pull it out of the mold and trial fit it. It turns out it sits a smidge high so i cut out the bottom flange around the horizontal cross tubes and the longerons to allow it to sit lower. I then noticed that it was wider than I wanted by about a 1/4″. The only solution I had besides making a new one, which I wasn’t going to do I cut a slit up the middle of the bulk head almost to the top so that I cut pull the two halves together. This worked and I added some carbon strips back into the bulk head to re-strengthen the area. After that cured I I trial fit it again with the turtle deck on and checked the fit. I did some adjustments to the interface a bit between the skin and the edge of the bulk head with my file. I will need to adjust it some more with some fiberfill and epoxy but that is for later.

After that I worked on a door for the turtle deck. to start I got a spare piece of 2024 T3 that was nice and smooth I laid it on a flat surface and then poor some epoxy on to the area roughly the size of the finish door. I then laid 3 layers of carbon into the area and let sit overnight. The next day I went out to go pick up some balsa wood for the core to stiffen the door up. Now I could just layer in more and more carbon but that is expensive and not very light. So I glued three 1/4″ balsa sheets end to end and cut out the shape of the core. I then epoxied the balsa in and laid 2 more layers of carbon on top. To get the nice vacuum bagged shape I really just used some 1/4″ wood around the balsa and pressed it with my tool box as weight. I used some left over ceconite as peel ply (simple polyester cloth works well too)

After the door was cured I notched the bottom for the piano hinge and I also notched the turtle deck front bulk head and I cleco’d the piano hinge in place. After I as satisfied I ran to the airport to rivet the door to the piano hinge. When I got back I installed the door with #6 SS screws and 100 deg washers. I ordered a Hartwell latch from Wicks aircraft who’s supply is apparently old because they sell them for $13.20 versus Aircraft Spruce’s $148 version. And yes they are the same latch by part number and brand name.

I then used some body filler to fill some spots on the aft bulk head so that the fabric won’t be chaffed there. I will spray some ekofill on it before I cover the fuselage. I then started to cut my old 2024 T3 mold up (dual purpose) to use as the floor of the turtle deck. I figured I had enough of carbon fiber work. and I wasn’t about ready to order more carbon fiber which is $35 a YD. So I just used the material I had. I took it to the airport to use the brake to fold up the side for bonding to the turtle deck sides. I had to do a bit of fitting but I got it to lay into the fuse and the turtle deck nicely.

Time spent 25 hours
Total time spent 1069 hours


Turtle deck forward and aft bulk head fabrication

January 15, 2012

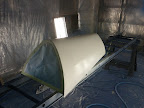
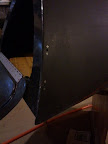
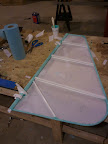
Sorry for no post lately I went on a great vacation with my family for 8 days. Anyway this post is a three day roll up of yet more turtledeck fabrication. I started off wednesday night (11jan12) by laying in some tape at the aft bulk head to mask the line so I could lay up a couple of tapes for the turtle deck flange. I also cut the straight line on the turtle deck tails so that they could be re-glued straight as to not chaffe the fabric so the plans say. After I masked the turtle deck side I laid up 3 layers of 5.8 oz 282 carbon fiber. I also clamped and taped the cut lines back together with 2 layers of 282.

The next day (thursday 12Jan12) I marked the cut line on the out side of the turtle deck and cut the mask line using my dremel tool being careful not to cut into the new flange. This worked ok, not quite as smooth of a line as I wanted but it worked good enough. I also worked on ideas for the forward mold.

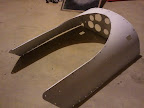
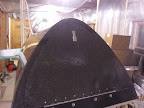
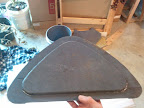
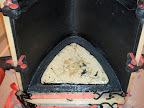
Saturday (14jan12) I decided to work on the mold for the forward bulkhead. I used my mold cut out blank and taped up the edges then I cut the same shape out of 0.016 2024-T3 I had laying around. I used the sheet metal because it gives a nice and perfect glossy finish. I then used my mid bulk head blank and trimmed it also radius the corners for to complete the “hole” space. and finally I used a block of wood that I taped with packing tape so that it wouldn’t stick. This one was a bit trickier since it had to be set at an angle and then screwed down into the wood of the cut out. I sandwiched everything together with dry wall screws and ratchet strapped in place which can be a big pain in the ass because of the angles/tapers of everything. I finally got it sitting in there nice and neat and laid up 3 layers of 5.8 oz 282 carbon graphite bi-weave into the mold.

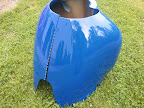
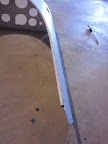
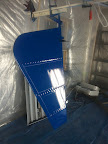
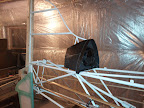
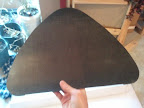
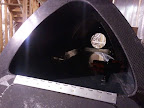
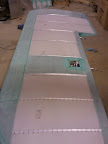
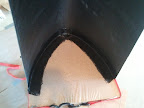
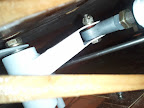
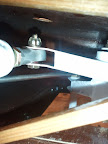
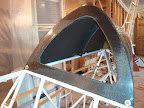
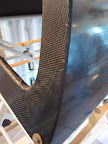
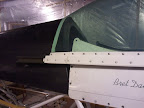
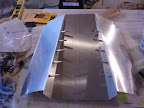
Sunday (15Jan12) I removed the mold and I was pleasantly surprised to find a perfectly molded beautiful forward bulk head. I trimmed it up and sanded the corners to a nice smooth radius. It fit well. I threw my canopy up on the fuselage to see how it fit and it fit well but then I noticed that I will be making a new canopy sheet metal since I tilt the turtle deck aft the metal no longer is long enough (see below picture) oh well, I’m replacing everything else might as well replace that too. I then spent most of the day building the mold for the aft bulkhead. This was done similarly to the forward bulkhead but instead of wood for the center piece I used a old plastic tub that just happened to be the right diameter. I again used sheet metal and tape for mold release. This time I laid up 4 layers since this one would be supporting fabric tension. The flange will be now 7 layers thick so nice and stiff hopefully. I spent the rest of my time cleaning up and playing around with the elevator trim cable since it came in the other day.

Time spent over 3 days: 20 hours
Total time spent: 1044 hours


Rib stitching and taping the lower right wing, turtle deck mid bulk head flange

December 30, 2011

Today I spent most of the day simply rib stitching the lower right wing. The long rib took about 40 minutes to complete where each smaller rib took about 20 minutes with breaks for my sore fingers it took me most of he day. After the stitching was completed, I started to tape the top of the wing’s ribs and spar. After all that was done I decided to work on the turtle deck some more. I used my wooden cut out of the mid section of my mold and I traced the correct location of the bulkhead while it was installed on the fuse. I then covered the wooden cut out with plastic for a releasing agent and held everything in turtle deck with straps. I laid in 2 layers of 5.8 oz 282 carbon graphite bi-weave and let it sit overnight. In the morning I removed the wood which release fairly easily and trimmed it up. And What do you know it fit perfectly. I will need to lay at least one more layer in there to stiffen it up a bit but I am happy with the results.

Time spent today 10 hours
Total time spent 1024 hours


Lower wing sanding and final assembly, making a carbon fiber turtle deck

December 28, 2011

Sorry for 2 week no post but i have been working on things. I have been sanding the clear coat on the lower wings with 320 open coat to smooth them out and to provide some grip for the glue. I then final installed the the lower wing control rods. Because small amount of clearance between the 90 deg bell crank control rod bearing bolt and the drag wire I had to install one of the control rod bearing bolts upside down for proper clearance of 1/4″ I used a castellated nut and cotter pin which proved to be a pain the ass to install under the I-strut wooden sheet panels.

I have been toying with building a carbon fiber turtle deck for awhile so I decided I was going to do that. I thought for awhile I could build it out of 1 layer of 282 (5.6 oz graphite) and 1 layer of 5.6 oz fiberglass but it came out too flimsy so I added yet another later of 282 and 5.6 oz fiberglass. Unfortunately it doubled the weight and now the skin weighs 3.25 lb which is the same as 0.025 2024T3. I probably could have saved some weight by using less layers and instead 2 total layers and some nomex however that stuff is expensive. The second layer really helped stiffen the skin up
Anyway I used this simple aluminum form made from particle board and 0.025 2024T3. I sprayed several layers of really cheep aerosol hair spray like Aqua Net super extra hold to keep the epoxy from sticking to the aluminum. As it turns out the higher the hold the better the anti-stick quality of the hairspray for molds.

Time spent 20 hours
Total time spent 1002 hours